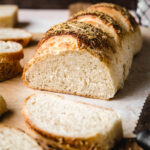
Crusty Homemade Italian Herb Cheese Bread
Crusty on the outside with a light and fluffy inside, this homemade Italian Herb Cheese Bread is the perfect addition to your dinner table. Loaves are topped with melted butter, garlic powder, Italian seasoning, and parmesan cheese. Yields 2 loaves.
Servings: 24
Calories: 93kcal
Ingredients
Poolish
- ¾ cup lukewarm water 90° to 100°F
- ½ teaspoon instant yeast
- 1 cup bread flour
Dough
- ¾ cup lukewarm water 90° to 100°F
- ½ teaspoon instant yeast
- Poolish from recipe above
- 2 tablespoons olive oil plus more for coating the bowl
- 1 ½ teaspoons salt
- 2 ¾ cups bread flour
Topping
- 2 tablespoons unsalted butter melted
- 1 teaspoon garlic powder
- 1 teaspoon Italian seasoning
- 2 tablespoons parmesan Cheese freshly grated
Instructions
Make the Poolish
- Pour warm water into a small bowl. Sprinkle instant yeast on top and stir gently to combine. Add in flour and stir until blended. This dough will be like thick cake batter. Cover with plastic wrap and let sit for at least 1 hour in a warm spot (place it in a cold oven with only the light). The dough will have lots of little bubbles and should jiggle. Alternately, place the poolish in the fridge overnight and remove about 1 hour prior to using.¾ cup lukewarm water, ½ teaspoon instant yeast, 1 cup bread flour
Make the Dough
- Once poolish is ready, make the dough. To the bowl of a stand mixer, add lukewarm water and sprinkle in the yeast. Whisk together to combine.¾ cup lukewarm water , ½ teaspoon instant yeast
- Using the paddle attachment on the stand mixer, stir in poolish from step 1, olive oil, and salt until thoroughly blended.Poolish from recipe above, 2 tablespoons olive oil, 1 ½ teaspoons salt
- Add bread flour. Stir on low speed until combined. Dough will be shaggy and slightly sticky.2 ¾ cups bread flour
- Cover with a clean kitchen towel and let rest for 20 minutes.
- Switch to the dough hook and knead the dough for several minutes until the dough is smooth and elastic, about 7-8 minutes.
- Lightly coat a large bowl with olive oil. Add dough to the bowl, turning the dough to cover in oil. Form the dough into a smooth ball by bringing the edges together on the bottom of the loaf, pinching to seal.Place the dough back in the bowl and cover with plastic wrap. Let the dough rise in a warm spot for 1 hour or until a finger gently pressed into the dough does not immediately bounce back. If the dough does bounce back immediately, allow it to rest for a few more minutes, then check again.
Pre-Shaping
- Turn the dough out onto a clean work surface. Gently press to deflate dough. Divide the dough in half (doesn’t have to be perfect, but you can use a kitchen scale if you prefer to get two evenly sized portions of dough). Working with each portion separately, press gently into a rough rectangle (6 x 9-inches) with the short edge closest to you. Starting with the far edge, roll the dough into a tight log. Repeat with the second piece. Cover both pieces of dough with a clean kitchen towel and let rest for 20 minutes.
Final Shaping
- Place a pizza peel or upside down baking sheet on your workstation. Line with a sheet of parchment paper. Set to the side for the moment.
- Flatten each piece of dough again into a rough rectangle (6 x 9-inches) with the long edge toward you this time. Roll into a tight log again, pinching the seam to seal. Turn the loaf over so the seam side is down and gently roll back and forth until the dough measures approximately 14 inches long. Repeat with the second loaf.
- Gently place loaves side-by-side on the prepared pizza peel or upside down baking sheet, leave a few inches of room between the loaves to allow room for rising.
- Brush each loaf generously with melted butter. Sprinkle with garlic powder then italian seasoning. Top with parmesan cheese. Brush off any excess cheese or spices that may have fallen onto the parchment paper to prevent burning.2 tablespoons unsalted butter, 1 teaspoon Italian seasoning, 1 teaspoon garlic powder, 2 tablespoons parmesan Cheese
- Cover the loaves loosely with plastic wrap and let rise for 30 minutes while you preheat the oven.
- Preheating instructions: For best results, place a baking stone or pizza stone on the middle shelf of the oven and place an empty 9x13 inch baking dish on the bottom shelf. Note: do not use a glass baking dish; be sure to use an aluminum baking pan. If you do not have a pizza stone, bake the loaves on the parchment on the overturned baking sheet. Preheat the oven to 400°F for 30 minutes.
Bake
- After 30 minutes, remove the kitchen towel and score each loaf with 3 deep slashes using a sharp knife, razor blade, or lame.
- Gently and carefully slide the parchment paper and loaves onto the preheated pizza stone. (Depending on the size of your baking stone, bake 1 or 2 loaves at a time.) Quickly pour one cup of hot water in the baking pan that’s sitting on the shelf beneath the pizza stone, closing the oven door quickly to prevent the steam from escaping. Bake for 20 to 25 minutes until the tops are golden brown and the internal temp of the loaves reach 200°F. Remove from the oven and cool for at least one hour on a wire rack before slicing.
Notes
- Bread is best the day it is made
- Store cooled bread at room temperature in a brown paper bag or bread bag for up to 4 days
- Store in the fridge for up to 1 week
- Note: the bread may lose some of its crispy and crustiness when stored
- To freeze a loaf, wrap loaf in plastic wrap and place in a freezer safe bag. Store in the freezer for up to 3 months. Defrost at room temperature.
- To freeze sliced bread, place slices on a parchment-lined baking sheet in a single layer. Freeze at least one hour then transfer frozen slices to a freezer safe bag and store in the freezer for up to 3 months. The slices may dry out a little when frozen this way. Thaw at room temperature
Nutrition
Serving: 1slice | Calories: 93kcal | Carbohydrates: 15g | Protein: 3g | Fat: 3g | Saturated Fat: 1g | Polyunsaturated Fat: 0.3g | Monounsaturated Fat: 1g | Trans Fat: 0.04g | Cholesterol: 3mg | Sodium: 154mg | Potassium: 28mg | Fiber: 1g | Sugar: 0.1g | Vitamin A: 34IU | Vitamin C: 0.01mg | Calcium: 10mg | Iron: 0.2mg
