Homemade Onion Bagels Recipe (made in 3 hours)
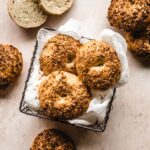
These onion bagels come together in about 3 hours, making them ideal for weekend breakfast or brunch. Makes 8 chewy bagels with a thin, crisp exterior.
Servings: 8
Calories: 252kcal
Equipment
- Spider tool , skimmer, or slotted spoon
Ingredients
- 3 ½ - 4 cups bread flour
- 2 ¼ teaspoons instant yeast one packet
- 1 tablespoon brown sugar
- 1 ½ teaspoon fine sea salt
- 1 ⅓ cups warm water 105ºF
- vegetable oil for coating the bowl
Egg wash
- 1 egg white lightly whisked
For topping
- 2 ounce (¼ cup) dried onion flakes such as McCormick brand Minced Onion
For boiling
- 2 quarts water
- 2 tablespoons brown sugar
Instructions
- In the bowl of a stand mixer with the dough hook attached, mix together the dry ingredients: 3 ½ cups of flour plus the yeast, brown sugar, and salt.3 ½ - 4 cups bread flour, 2 ¼ teaspoons instant yeast, 1 tablespoon brown sugar, 1 ½ teaspoon fine sea salt
- With the mixer running on low, gradually stream in the warm water until a dough forms around the hook without any dough sticking to the sides or bottom of the bowl.1 ⅓ cups warm water
- Knead the dough (Kitchenaid speed 2) for about 10-15 minutes until a smooth dough forms, adding more flour as needed to get a stiff dough. The dough should not be sticking to the bottom or sides of the bowl at all. If it is, add more flour, 1 tablespoon at a time until the flour is incorporated and the dough forms around the dough hook and does not stick to the bowl. This dough can also be kneaded by hand, if you do not have a stand mixer. Perform the windowpane test to ensure the dough is ready.To use the windowpane test to check dough for proper gluten development, pinch off (don’t tear) a small piece of dough. Roll it in your hands to form a small ball. Slowly pull the dough out from the center. If the dough is ready, you will be able to stretch it until it’s thin and translucent like a windowpane. If the dough tears, it’s not quite ready. Continue kneading for 1 minute more then test again.
- Once the dough is ready, lightly brush a large bowl with vegetable oil and turn the dough to coat in oil on all sides. Cover the bowl with a damp kitchen towel or plastic wrap and let the dough rise in a warm place for 1 hour, or until the dough has doubled in size. I like to place the dough in a cold oven with just the light on. This provides just the right amount of warmth (about 80ºF) to proof the dough nicely.vegetable oil
- Remove the plastic wrap and punch the dough down to remove the air. Cover again and let it rest for another 10 minutes.
- Turn the dough out onto a lightly floured surface such as a clean counter or large cutting board. Using a bench scraper or sharp knife, divide the dough into 8 equal pieces. You can eyeball this or use a kitchen scale to weigh each piece to get identical sized bagels. Shape each piece into a smooth ball To do so, bring the edges of the piece of dough together into the center and pinch tightly to seal. Place the dough ball, seam side down, on a part of your counter without flour and cup your hand around the ball, rolling it around on the counter to form a smooth ball. Place each tight ball on a lightly floured work surface and cover with a damp towel or plastic wrap to prevent them from drying out and a skin from forming on the outside.
- Line two baking sheets with parchment paper and set them next to your counter or work station. Adjust the racks in your oven to be placed in the top ⅓ of the oven and bottom of ⅓ of the oven, avoiding the very top rung, if possible, to prevent the tops of the bagels from burning.
- Once all 8 rounds have been formed, dip your index finger in flour and gently press your finger into the center of each dough ball to poke a hole through to the other side. Place both index fingers into the hole and roll them around in a quick circular motion to stretch the hole to about 2 inches in diameter. Place the formed bagels on a parchment paper lined baking sheet, no more than 4 to a tray. Repeat with the remaining dough.These bagels can be made the same day or the next day. I've tried both methods and they both work equally as well. Same day method: After shaping the bagels, cover with plastic wrap or a damp kitchen towel and allow to rest in a warm spot for 1-1- ½ hours, or until doubled in size. If using instant yeast, the bagel dough may need less time to rise after shaping. This may also be the case if your kitchen is very warm or if you live in a warm climate. To check to see if your bagels are fully proofed (risen), press your finger gently into a bagel. If the dough bounces back right away, the bagels need more time to rise. If the indentation remains and slowly bounces back, the dough is ready for the boiling step.Overnight method: Spray a piece of plastic wrap with nonstick cooking spray and cover the bagels with the sprayed side down. This will prevent the dough from sticking to the plastic wrap. Place the shaped bagels in the fridge overnight, about 8-12 hours.
- Preheat your oven to 400°F. Line another baking sheet with parchment paper and set aside. Lightly whisk egg white in a small bowl and set aside. Pour enough dried onion flakes on a separate plate to cover the surface, and set aside for after the bagels have boiled.1 egg white lightly whisked, 2 ounce (¼ cup) dried onion flakes
- Add 2 quarts of water to a Dutch Oven and bring to a boil. Reduce the heat and add in the brown sugar, stirring to dissolve. Use a slotted spoon or skimmer to lower the bagels one at a time into the water. Boil no more than 4 bagels at one time to avoid overcrowding. Bagels will float after a couple of seconds. Allow to boil for 2 minutes, and then flip them over to boil for another minute. Use a slotted spoon or skimmer to lift the boiled bagels one at a time out of the water. Place on a prepared baking sheet.2 quarts water, 2 tablespoons brown sugar
- Brush the top of the bagels with egg white and immediately dip in dried onion flakes to cover the top of the bagel. Place the bagels back on the baking sheet and repeat with remaining bagels, adding more dried onion to the plate as needed. I typically end up using the entire 2 ounce container of dried onion for this recipe.
- Bake for 20 - 25 minutes in the preheated oven, or until golden brown on top, rotating the trays halfway through baking to ensure even cooking. Keep an eye on the bagels to ensure the onions are not burning. This can happen is the oven rack is located towards the very top of the oven. Remove from the oven and transfer to a wire rack to cool slightly. Serve warm with cream cheese and lox, butter, or jam and enjoy!
Notes
- To store: Store cooled bagels in an airtight container or ziplock bag at room temperature for 2-3 days. Place in the fridge up to one week.
- To freeze: Cut bagels in half and freeze up to 3 months. Defrost at room temperature then toast and serve.
Nutrition
Calories: 252kcal | Carbohydrates: 51g | Protein: 9g | Fat: 1g | Saturated Fat: 0.2g | Polyunsaturated Fat: 0.4g | Monounsaturated Fat: 0.2g | Sodium: 462mg | Potassium: 214mg | Fiber: 3g | Sugar: 7g | Vitamin A: 2IU | Vitamin C: 5mg | Calcium: 40mg | Iron: 1mg
