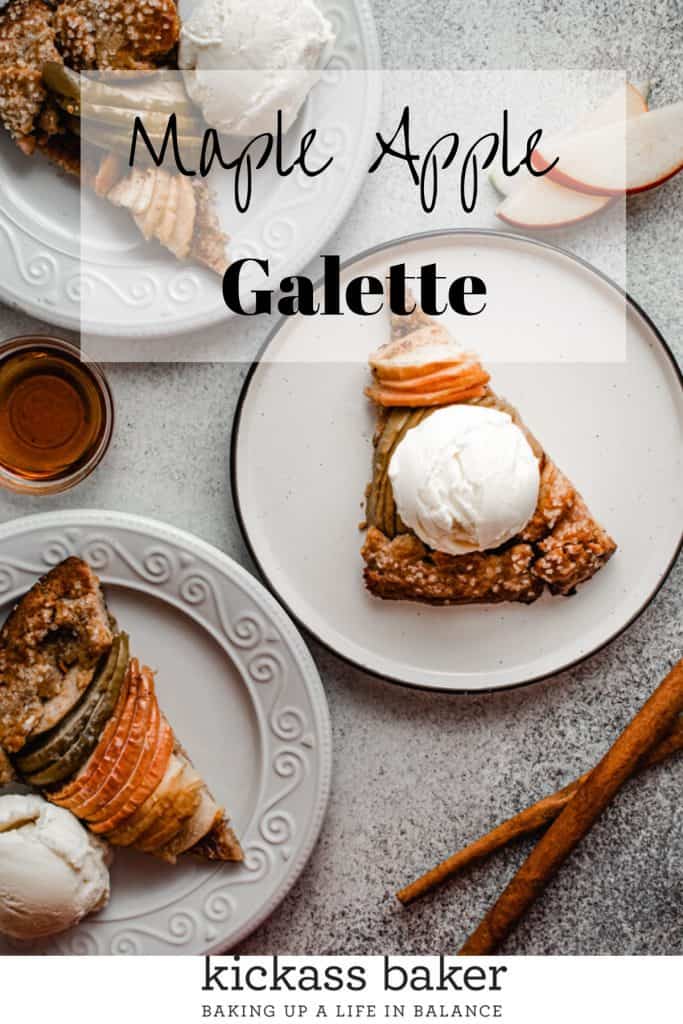
A galette is a wonderfully easy yet elegant looking dessert to serve when friends and family get together. It’s much easier to put together than most scratch-made pies and is very forgiving when adding your filling.
I am a big fan of the rustic look of this Maple Apple Galette, the Fall flavors and the ease with which this dessert comes together.

Please note: As an Amazon Associate I earn from qualifying purchases made by clicking the links in my post
What is a Galette and how is it different than Pie?
Galettes are wonderful in that they seem fancy and sophisticated, however they're much easier than pie to put together.
A galette is a rustic, free-form pie or tart made with a single crust of pastry. It usually has a filling and the sides folded over.
Folding the sides of the dough over the filling helps contain the filling especially if the filling has a lot of moisture. Basically, a galette acts like a pie but without all the rules.
This allows you the freedom to create a dessert that seems refined but is much easier to put together than your guests will think. That’s my kinda pie!

Maple and Apple Fall flavors
Absolutely nothing against pumpkin, but.... sometimes we want a change. A variety in our diet during the Fall season.
Apple and maple go so well together, especially in Fall. You can really use any variety of apples you have to make this Maple Apple Galette.
I prefer a combination of sweet Honeycrisp and tart Granny Smith apples in this Maple Apple Galette. Pink ladies, another fave of mine, would be really tasty in here , too!

How to Prepare a Maple Apple Galette
Start out by preparing the crust by pulsing together flour, sugar and salt in a food processor. Add in cold butter and pulse until large chunks are formed.
Then drizzle in egg, cream, maple syrup and cinnamon and pulse just until the dough comes together in a ball. Wrap in plastic wrap and refrigerate for at least 1 hour.
Roll out the dough into a 12-inch round. Slice half the apples and chop the remainder. Spread the chopped apples onto the prepared dough.

Drizzle the maple syrup over top of the chopped apples.

Arrange the sliced apples in concentric circles or overlapping rows on top of the chopped apples.

Sprinkle with cinnamon sugar mixture.


Dot the filling with small pieces of butter.

Fold the dough up and over the filling to create a 1-inch crust.

Brush the crust with egg and sprinkle with sparkling sugar. Bake for 45 minutes or until the crust is golden.

Allow to cool for 20 minutes, slice and serve with a scoop of vanilla ice cream!

Tips for Making This Recipe
- Be sure to allow your crust to rest and chill in the fridge for at least an hour before you roll it out. This allow the butter to chill and helps create those nice flaky layers when baked. If you find the dough difficult to roll out after it's been chilled, try allowing it to rest for about 10 minutes before rolling. You don't want it to come to room temperature, but allowing it to warm up just a tad is okay and will make rolling much easier. You can also try beating your dough with your rolling pin by holding your rolling pin horizontal to the dough and bringing the rolling pin down hard onto the dough. I know, this sounds really harsh, but it works well. It loosens the dough up a bit and makes it easier to roll
- Galettes allow you to create a rustic, free-form pie. So my biggest tip is to not strive for perfection here. You'll want to make the crust and filling according to the recipe measurements, of course. However, as far as rolling out the dough and adding the filling, none of this needs to be done perfectly. In fact, the more rustic looking the better, I say!
- Similar to the note above, feel free to slice, dice, or chop your apples any way you'd like for this filling. Use my instructions below as a guideline rather than a rule in this case. I have made galettes where I tossed sliced and chopped apples in and it came out looking delicious and rustic and tasted fabulous

Like this recipe? Follow me on Pinterest for lots more recipes just like this one! And don’t forget to pin this recipe for later by clicking on one of the images below the recipe. Or, click on any of the images in this post to save to Pinterest.
Useful Kitchen Tools for This Recipe
FOR ALL MY FAVORITE BAKING TOOLS INCLUDING THOSE USED TO MAKE THIS RECIPE, CHECK OUT MY BAKING RESOURCES PAGE!
For more recipes like this one, check these out:
Did you enjoy a KICKASS BAKER recipe? Please share a comment and leave a 5 Star ⭐️⭐️⭐️⭐️⭐️ Rating on this recipe! We appreciate you sharing your feedback!

Ingredients
Crust
- 1 ⅓ cups all-purpose flour
- 1 tablespoon granulated sugar
- 1 teaspoon kosher salt
- 1 large egg
- heavy cream as needed
- 2 teaspoons pure maple syrup
- ½ teaspoon ground cinnamon
- ½ cup unsalted butter cut into big pieces
Filling
- 2 large Granny Smith apples
- 2 large Honeycrisp apples
- 2 tablespoons granulated sugar
- ½ teaspoon ground cinnamon
- 2 tablespoons pure maple syrup
- 1 tablespoon unsalted butter cut into small pieces
- 1 large egg beaten
- sparkling sugar or granulated sugar for sprinkling
Instructions
Make the Dough:
- In a food processor fitted with a steel blade, or in a large bowl, pulse or mix together flour, sugar, and salt.1 ⅓ cups all-purpose flour, 1 tablespoon granulated sugar, 1 teaspoon kosher salt
- In a measuring cup, lightly beat the egg, then add just enough cream to get to ⅓ cup.1 large egg, heavy cream
- Lightly whisk the egg, cream, maple syrup, and cinnamon together. Set aside.2 teaspoons pure maple syrup, ½ teaspoon ground cinnamon
- Add butter to flour mixture and pulse or use a pastry cutter or your fingers to break up the butter. If using a food processor, do not over-process; you need chickpea-size chunks of butter.½ cup unsalted butter
- Drizzle the egg mixture over the dough and pulse or stir until it just starts to come together but is still mostly large crumbs. Pulse just until dough comes together in a ball.
- Put dough on large piece of plastic wrap and pat it together to make one uniform piece. Flatten into a disk, wrap in plastic and chill for 2 hours, or up to 3 days.
- Preheat the oven to 400ºF.
- Roll the dough out to a 12-inch round using a rolling pin (it can be ragged along the edges).
- Transfer to a rimmed baking sheet lined with parchment paper and chill while preparing the filling.
Make the Filling:
- Core the apples and slice in half. Slice each half crosswise to ¼ inch thick. Set aside the larger center slices and coarsely chop the end slices and any broken ones; about half of the slices should be chopped.2 large Granny Smith apples, 2 large Honeycrisp apples
- In a small bowl, combine the sugar and cinnamon.2 tablespoons granulated sugar, ½ teaspoon ground cinnamon
- Spread the chopped apples over the pastry to within 1 inch of the edge.
- Drizzle the maple syrup over the chopped apples.2 tablespoons pure maple syrup
- Decoratively arrange the apple slices on top in concentric circles or in slightly overlapping rows.
- Sprinkle the cinnamon sugar evenly over the apples and dot with the pieces of butter.1 tablespoon unsalted butter
- Fold the pastry edge up and over the apples to create a 1-inch crust border.
- Brush pastry crust lightly with beaten egg. Sprinkle sparkling sugar on the crust.1 large egg, sparkling sugar or granulated sugar
- Bake for 45 minutes or until the crust is golden.
- Cool for at least 20 minutes on wire rack.
- Brush the apples with maple syrup just before serving.
- Serve warm or at room temperature. And with a scoop of ice cream if you’re feeling really adventurous!
Notes
- Prepared dough can be kept in fridge for up to 3 days before baking.
- Store baked galette wrapped tightly in plastic wrap in the fridge for up to 5 days. Warm gently in the microwave or oven at low temp before serving.
- Recipe adapted from FoodAndWine.com.
Nutrition


Comments
Tasia ~ two sugar bugs
This maple apple galette looks amazing Kim! I'm always a fan of the rustic beauty of a galette!
Kim
It's so fun to make and tastes great! Thanks, Tasia 🙂