With store-bought puff pastry and a make-ahead chocolate spread filling, this stunning dessert will be ready in no time. And your guests will love the look of it as well as the cinnamon sugary chocolatey taste.
But, I have a secret. It's really not that difficult to make at all.
Wanna create a showstopper for your holiday dessert table? This Puff Pastry Christmas Tree is your ticket to impress this holiday season.

Please note: As an Amazon Associate I earn from qualifying purchases made by clicking the links in my post. These commissions allow me to continue to provide you with quality content and recipes.
How to make a Puff Pastry Christmas Tree
Making a Puff Pastry Christmas Tree dessert begins with two sheets of frozen puff pastry. Yes, you could certainly make the puff pastry from scratch.
However, I find the frozen sheets to work perfectly well and this cuts down tremendously on the amount of time it takes to prepare this dessert.
Time is difficult to come by this time of year so I try to make it as easy on myself as possible when it comes to preparing holiday treats and desserts.
If you've ever worked with frozen puff pastry before, you'll know it typically comes in a pack of two sheets. This works out well because that's exactly how much we need! Be sure to remove the puff pastry from the freezer at least 20 -30 minutes prior to beginning to bake.
The sheets come folded and if you attempt to unfold them while frozen or semi-frozen, they will surely crack or break. And this, my friends, is not a good start to creating this Christmas dessert.
PS TikTok famous Puff Pastry Christmas Trees with Nutella.


Assembling a Stunning and Tasty Holiday Dessert
Following the photos here as a guide, place both sheets of pastry on top of each other and cut out the shape of a Christmas Tree.
Doesn't have to be perfect, my friends! Remove the top layer of pastry and spread the chocolate sauce.
Note: you can certainly purchase pre-made chocolate spread to make it even easier on yourself, too. And no one will know or care because this Puff Pastry Christmas Tree is so impressive and tasty!

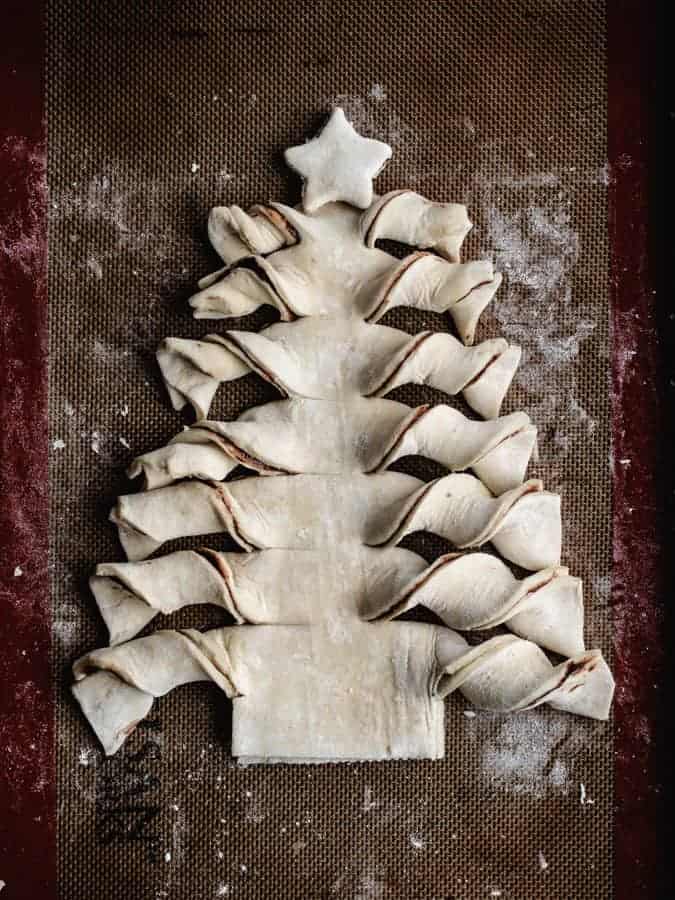
Place the top layer of pastry on top of the chocolate spread and make even cuts along both sides to make the "branches."
As you'll see from the photo, I left only about ½ an inch for the "tree trunk" between the two sides of branches.
The reason for this is that you need to have enough of a branch to make those beautiful twists. Once you've cut your branches, carefully twist each branch two times and press gently into the baking sheet to stay in place.

Lastly, use the leftover pastry dough that you cut off when creating the tree shape to cut out two layers of a star to go on top of the tree. I used a small star-shaped cookie cutter since that's all I had.
Feel free to use whatever size suits you. Place one layer of pastry on top of the tree, pressing down gently to keep the star in place on top of the tree.
Fill with chocolate spread and top with second layer of pastry. Lightly brush egg yolk and water mixture onto the tree and star and bake!
Don't forget to brush with melted butter and sprinkle with cinnamon sugar to finish it off. I like to serve it with a side of the chocolate spread warmed for dipping.

Tips for Making This Recipe
- Prepare the chocolate spread ahead of time so it has time to thicken and cool before using. Or buy a jar from the store and save yourself even more time and unnecessary holiday stress
- Allow your frozen puff pastry to thaw before attempting to unfold it and prepare this holiday dessert. This prevents cracking or breaking and lots of swearing
- One of the keys to success here is having a sharp knife. If your knives haven't been sharpened in awhile, I recommend this great little sharpening device on Amazon. It'll helps tide you over till you can get to a real sharpening. It has great reviews on Amazon and I personally use it often and love it. I mean, who has time to get their knives sharpened anyway? (we really should get them professionally done, I know, I know...). The reason you need a sharp knife is to cut into the puff pastry cleanly and evenly. With a dull knife you'll end up a) cutting yourself b) dragging through the puff pastry creating jagged cuts or c) having to apply too much pressure when cutting that may result in cutting through your parchment paper, silpats or even leaving knife marks on your baking pan. No bueno
- Keep in mind that perfection is not the goal here. Serving up a delicious and impressive looking dessert doesn't mean your tree needs to be perfectly symmetrical and every branch twisted in the same direction. Have fun and enjoy the process and the end result!

Useful Kitchen Tools for Making This Recipe
FOR ALL MY FAVORITE BAKING TOOLS INCLUDING THOSE USED TO MAKE THIS RECIPE, CHECK OUT MY BAKING RESOURCES PAGE!

Like this recipe? Follow me on Pinterest for lots more recipes just like this one! And don’t forget to pin this recipe for later by clicking on one of the images below the recipe. Or, click on any of the images in this post to save to Pinterest.
For more Holiday dessert recipes, check these out:


Did you enjoy a KICKASS BAKER recipe? Please share a comment and leave a 5 Star ⭐️⭐️⭐️⭐️⭐️ Rating on this recipe! We appreciate you sharing your feedback!

Ingredients
Chocolate Spread
- ¼ cup water
- ½ cup granulated sugar
- 1 tablespoon unsweetened cocoa powder
- ¼ teaspoon kosher salt
- 1 teaspoon vanilla extract
- ⅔ cup bittersweet chocolate finely chopped
- 10 tablespoons unsalted butter room temperature, cubed
Puff Pastry Christmas Tree
- 2 sheets puff pastry thawed
- 2 tablespoons chocolate spread from recipe above or store-bought chocolate spread
- 1 large egg yolk
- 1 tablespoon unsalted butter melted
- 1 tablespoon granulated sugar
- ¼ teaspoon ground cinnamon
Instructions
Make the Chocolate Spread
- In a small saucepan, combine the water, granulated sugar, unsweetened cocoa powder, and salt. Place the pan over medium heat and stir until the sugar and cocoa powder dissolve. Continue to heat the pan, stirring frequently, until it reaches a simmer. Once simmering, remove the pan from the heat and add the vanilla extract, chopped chocolate, and cubed butter. Whisk until the chocolate and butter melt and the mixture is completely smooth. Pour the spread into a jar or other container with a lid. Press a layer of plastic wrap on top of the chocolate to prevent a skin from forming, and refrigerate it until it thickens.¼ cup water, ½ cup granulated sugar, 1 tablespoon unsweetened cocoa powder, ¼ teaspoon kosher salt, 1 teaspoon vanilla extract, ⅔ cup bittersweet chocolate, 10 tablespoons unsalted butter
Prepare Christmas Tree Puffy Pastry:
- Line a baking sheet with parchment paper or silicone baking mat. Place puff pastry sheets on top of each other on lined baking sheet. Carefully cut out both puff pastry sheets in the shape of a Christmas tree, following the photos for guidance. Be careful not to cut through parchment or silicone mat. Reserve leftover puff pastry.2 sheets puff pastry
- Remove top layer of puff pastry, setting aside on a clean countertop or another baking sheet. Spread chocolate spread in a thin layer on bottom sheet of puff pastry, leaving a ½ inch border. Place the second puff pastry sheet on top of chocolate spread, lining up the pieces so the tree cut-outs are directly on top of one another. Cut slits on both sides of tree spacing them about 1-inch apart, leaving the center of the tree intact. Follow photos for guidance. Twist each strip of pastry twice, pressing the ends gently but firmly into the baking sheet so they do not untwist.2 tablespoons chocolate spread
- Using a star-shaped cookie cutter, cut out two star shapes from the leftover puff pastry. Spread one star layer with chocolate spread and place the other star shape layer of puff pastry on top. Place the star on the top of the tree, pressing down gently so the star sticks in place.
- Whisk the egg yolk with ½ teaspoon water. Brush the top of the tree and star lightly with egg yolk mixture. Bake for 25-30 minutes at 400°F until golden brown. Allow to cool for 5 minutes. Lightly brush pastry with melted butter (you may not use it all) and sprinkle with cinnamon sugar. Serve with a side of warmed chocolate spread for dipping!1 large egg yolk, 1 tablespoon unsalted butter, 1 tablespoon granulated sugar, ¼ teaspoon ground cinnamon
Notes
- The chocolate spread will thicken as it cools. However, it may be too thick to spread easily once it’s cooled completely in the fridge. Let it sit at room temperature for about 30 minutes prior to using or warm gently in the microwave by removing the lid and heating in 20 second increments at 50% power, stirring in between, until it reaches desired consistency. Store chocolate spread tightly covered in the refrigerator for up to two weeks.
- Wrap leftover baked puff pastry tree in plastic wrap and store in the fridge for up to 4 days. Reheat in the oven at 350ºF for 10 minutes prior to serving.
- Puff pastry inspired by Cafe Delites; Chocolate Spread recipe by Sugar Hero.
Nutrition


Comments
Mayanka Khetarpal says
Hi Kim,
Do you have a puff pastry recipe, don’t have any great ready made puff pastry here
Thanks,
Mayanka
Kim says
Hi Mayanka! I don't yet have a recipe for puff pastry on my blog, however, there are several good ones out there. Try TheKitchn.com or foodnetwork.com. Good luck and enjoy!